
01_基本介绍

Vue 概念:Vue (读音 /vjuː/,类似于 view) ,是一套构建用户界面的渐进式 JavaScript 框架。

• 用户界面:基于数据渲染出用户可以直接看到的 HTML 界面。
• Library(库)和 Framework(框架):库的特点是小而巧,针对特定问题的单一解决方案。框架的特点是大而全,提供了一整套的解决方案。
02_快速上手
常见使用 Vue 的方法如下:
• 官方提供的 演练环境;
• 通过引入 CDN 的方式;
<script src="https://unpkg.com/vue@3/dist/vue.global.js"></script>• 通过脚手架(Vite 或 Webpack)的方式,本教程后续所有的演示都使用 Vite。
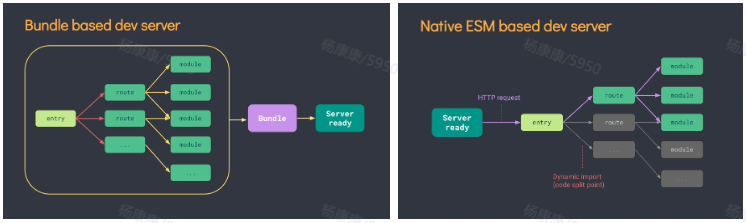
Vite 是什么:下一代前端开发与构建工具,相比较 Webpack,热更新、打包构建速度更快,它会瞬间开启一个服务,当浏览器用到某个文件时,Vite 服务会收到请求然后编译后响应到客户端(并不会先编译所有文件),我们后面学习的知识点都会在 Vite 创建的项目基础上进行。
03_代码演示
需要你已安装 16.0 或更高版本的 https://nodejs.org/
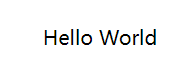
📌 学习目标:使用 Vue 快速创建一个应用,渲染出 “Hello World” 文案。
方式一:使用 Vite(推荐)
Vite 是下一代前端开发与构建工具,相比较 Webpack,热更新、打包构建速度更快。
打开命令行工具(CMD、Power Shell 或 Git Bash 等),使用下面命令创建项目:
## npm 7+, extra double-dash is needed:
npm create vite@latest my-vue-app -- --template vue

## yarn
yarn create vite my-vue-app --template vue

## pnpm
pnpm create vite my-vue-app --template vue

## bun
bunx create-vite my-vue-app --template vue
使用 Vite 创建出的项目如下:

方式二:使用 Vue CLI
Vue CLI 是 Vue 官方提供的标准化脚手架工具,基于 Webpack 构建。
安装 Vue CLI
npm install -g @vue/cli
# 或
yarn global add @vue/cli
# 或
pnpm add -g @vue/cli
创建项目
vue create my-vue-app创建时会提示选择预设:
? Please pick a preset:
  Default ([Vue 2] babel, eslint)
  Default (Vue 3) ([Vue 3] babel, eslint)
> Manually select features  # 手动选择特性
手动选择特性配置
? Check the features needed for your project:
 ◉ Babel
 ◯ TypeScript
 ◯ Progressive Web App (PWA) Support
 ◉ Router
 ◉ Vuex
 ◯ CSS Pre-processors
 ◉ Linter / Formatter
 ◯ Unit Testing
 ◯ E2E Testing
启动项目
cd my-vue-app
npm run serve  # 开发环境
npm run build  # 生产构建
Vite vs Vue CLI 对比
| 特性 | Vite | Vue CLI |
|---|---|---|
| 构建工具 | 原生 ES 模块 | Webpack |
| 启动速度 | 极快(毫秒级) | 较慢(需打包) |
| 热更新 | 快速 | 较慢 |
| 配置复杂度 | 简单 | 较复杂 |
| 生态成熟度 | 较新 | 成熟稳定 |
| Vue 版本 | Vue3 优先 | Vue2/3 都支持 |
💡 建议:新项目推荐使用 Vite,老项目维护可继续使用 Vue CLI。
实现步骤
a. 在 main.js 中按需导入 createApp 函数;
b. 定义 App.vue 根组件,导入到 main.js;
c. 使用 createApp 函数基于 App.vue 根组件创建应用实例;
d. 挂载至 index.html 的 #app 容器。
main.js
import { createApp } from "vue";
import App from "./App.vue";
const app = createApp(App);
app.mount("#app");
App.vue
<template>
  <div>Hello World</div>
</template>
04_模板语法
Vue 使用一种基于 HTML 的模板语法,使我们能够声明式地将其组件实例的数据呈现到 DOM 上。
文本插值
最基本的数据绑定形式是文本插值,它使用的是“Mustache”语法 (即双大括号):
<script setup>
const msg = 'Hello World'
</script>
<template>
  <div>{{ msg }}</div>
</template>.png)
原始 HTML
双大括号会将数据解释为纯文本,而不是 HTML。若想插入 HTML,你需要使用 v-html 指令:
<p>Using text interpolation: {{ rawHtml }}</p>
<p>Using v-html directive: <span v-html="rawHtml"></span></p>
更多细节,参考官方文档。
Attribute 属性
双大括号不能在 HTML attributes 中使用。想要响应式(所谓响应式数据,就是数据的变化会自动更新到视图)地绑定一个 attribute,应该使用 v-bind 指令:
<script setup>
const dynamicId = 'dynamic-id'
</script>
<template>
  <div v-bind:id="dynamicId"></div>
</template>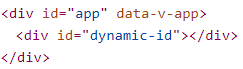
更多使用细节,参考官方文档。
05_响应式语法
5.1 选项 API/组合 API
目标
📌 理解什么是 Options API 写法,什么是 Composition API 写法。
需求
📑 分别使用 Vue2 和 Vue3 实现下面的效果(鼠标在文档移动时呈现位置;点击自增按钮让数字加 1:
Vue2 实现
<script setup>
import {
  onBeforeMount,
  onMounted,
  onBeforeUpdate,
  onUpdated,
  onBeforeUnmount,
  onUnmounted,
  reactive,
} from "vue";
const state = reactive({
  msg: "Hello World",
});

onBeforeMount(() => {
  console.log("onBeforeMount");
});
onMounted(() => {
  console.log("onMounted");
});
onBeforeUpdate(() => {
  console.log("onBeforeUpdate");
});
onUpdated(() => {
  console.log("onUpdated");
});
onBeforeUnmount(() => {
  console.log("onBeforeUnmount");
});
onUnmounted(() => {
  console.log("onUnmounted");
});
</script>

<template>
  <p>{{ state.msg }}</p>
  <button @click="state.msg = 'xxx'">update msg</button>
</template>
• 🎉 优点:易于学习和使用,写代码的位置已经约定好;
• 💊 缺点:数据和业务逻辑分散在同一个文件的 N 个地方,随着业务复杂度的上升,可能会出现动图左侧的代码组织方式,不利于管理和维护。
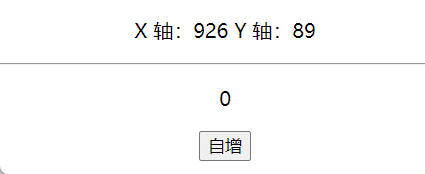
Vue3 实现
<script setup>
import { onMounted, onUnmounted, reactive, ref } from "vue";
// !#Fn1
const mouse = reactive({
  x: 0,
  y: 0,
});
const move = (e) => {
  mouse.x = e.pageX;
  mouse.y = e.pageY;
};
onMounted(() => {
  document.addEventListener("mousemove", move);
});
onUnmounted(() => {
  document.removeEventListener("mousemove", move);
});

// !Fn2
const count = ref(0);
const add = () => {
  count.value++;
};
</script>
<template>
  <div class="container">
    <p>X 轴:{{ mouse.x }} Y 轴:{{ mouse.y }}</p>
    <hr />
    <div>
      <p>{{ count }}</p>
      <button @click="add()">自增</button>
    </div>
  </div>
</template>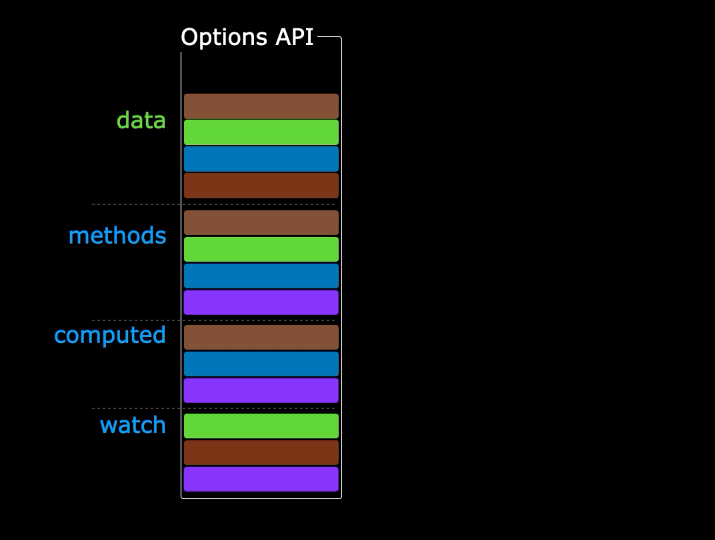
• 🎉 优点:可以把同一功能的数据和业务逻辑组织到一起,方便复用和维护;
• 💊 缺点:需要有良好的代码组织和拆分能力,相对没有 Vue2 容易上手。
为了能让大家较好的过渡到 Vue3.0 版本,目前也支持 Vue2.x 选项 API 的写法,但不建议。
小结
Vue3 Composition API 可以把 __ 和 __ 组合到一起?(原文留空,此处保留原样)
5.2 reactive 包装数组
reactive 是一个函数,用来将普通对象/数组包装成响应式式数据(基于 Proxy),注意它无法直接处理基本数据类型。
需求
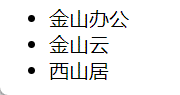
📝 点击删除当前行信息。
<script setup>
const arr = ["金山办公", "金山云", "西山居"];
const removeItem = (index) => {
  arr.splice(index, 1);
};
</script>
<template>
  <ul>
    <li v-for="(item, index) in arr" :key="item" @click="removeItem(index)">
      {{ item }}
    </li>
  </ul>
</template>
问题
❗ 数据确实是删了,但视图没有更新(不是响应式的)。
解决
使用 reactive 包装数组使变成响应式数据。
<script setup>
import { reactive } from "vue";
const arr = reactive(["金山办公", "金山云", "西山居"]);
const removeItem = (index) => {
  arr.splice(index, 1);
};
</script>

<template>
  <ul>
    <li v-for="(item, index) in arr" :key="item" @click="removeItem(index)">
      {{ item }}
    </li>
  </ul>
</template>
5.3 reactive 包装对象
需求
📝 实现列表渲染、删除和添加功能。
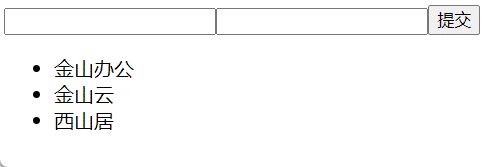
列表删除
<script setup>
import { reactive } from "vue";
const state = reactive({
  arr: [
    {
      id: 0,
      name: "金山办公",
    },
    {
      id: 1,
      name: "金山云",
    },
    {
      id: 2,
      name: "西山居",
    },
  ],
});
const removeItem = (index) => {
  // 默认是递归监听的,对象里面任何一个数据的变化都是响应式的
  state.arr.splice(index, 1);
};
</script>
<template>
  <ul>
    <li
      v-for="(item, index) in state.arr"
      :key="item.id"
      @click="removeItem(index)"
    >
      {{ item.name }}
    </li>
  </ul>
</template>
抽离函数
优化:将同一功能的数据和业务逻辑抽离为一个函数,代码更易读,更容易复用。
<script setup>
import { reactive } from "vue";

function useRemoveItem() {
  const state = reactive({
    arr: [
      {
        id: 0,
        name: "金山办公",
      },
      {
        id: 1,
        name: "金山云",
      },
      {
        id: 2,
        name: "西山居",
      },
    ],
  });
  const removeItem = (index) => {
    state.arr.splice(index, 1);
  };
  return { state, removeItem };
}

const { state, removeItem } = useRemoveItem();
</script>
<template>
  <ul>
    <li
      v-for="(item, index) in state.arr"
      :key="item.id"
      @click="removeItem(index)"
    >
      {{ item.name }}
    </li>
  </ul>
</template>
添加功能
错误写法一:user 对象没有用 reactive 进行包裹,导致输入时不是响应式的。
<script setup>
import { reactive } from "vue";
function useRemoveItem() {
  const state = reactive({
    arr: [
      {
        id: 0,
        name: "金山办公",
      },
      {
        id: 1,
        name: "金山云",
      },
      {
        id: 2,
        name: "西山居",
      },
    ],
  });
  const removeItem = (index) => {
    state.arr.splice(index, 1);
  };
  return { state, removeItem };
}
function useAddItem(state) {
  // user 没有用 reactive 包裹
  const user = {
    id: "",
    name: "",
  };
  const handleSubmit = () => {
    state.arr.push({
      id: user.id,
      name: user.name,
    });
    // 思考:由于 user 没有用 reactive 进行包裹,按理来说对 user 的修改视图是不会响应的,但这里为什么表现正常呢?
    user.id = "";
    user.name = "";
  };
  return {
    user,
    handleSubmit,
  };
}

const { state, removeItem } = useRemoveItem();
const { user, handleSubmit } = useAddItem(state);
</script>
<template>
  <form @submit.prevent="handleSubmit">
    <input type="text" v-model="user.id" />
    <input type="text" v-model="user.name" />
    <input type="submit" />
  </form>
  <ul>
    <li
      v-for="(item, index) in state.arr"
      :key="item.id"
      @click="removeItem(index)"
    >
      {{ item.name }}
    </li>
  </ul>
</template>
错误写法二:直接 push 了原对象,导致会相互影响。
const handleSubmit = () => {
  // !这里直接添加了 user 到 arr,后续对 user 的操作会影响添加到 arr 中的数据
  state.arr.push(user)
  user.id = ''
  user.name = ''
}
解决方法如下:
const handleSubmit = () => {
  // 方法1
  /* state.arr.push({
    id: user.id,
    name: user.name,
  }) */
  // 方法2
  /* state.arr.push({
    ...user,
  }) */
  // 方法3
  const userCopy = Object.assign({}, user)
  state.arr.push(userCopy)
  user.id = ''
  user.name = ''
}
拆分文件
remove.js
import { reactive } from "vue";
export default function userRemoveItem() {
  const state = reactive({
    arr: [
      {
        id: 0,
        name: "ifer",
      },
      {
        id: 1,
        name: "elser",
      },
      {
        id: 2,
        name: "xxx",
      },
    ],
  });
  const removeItem = (index) => {
    state.arr.splice(index, 1);
  };
  return { state, removeItem };
}
add.js
import { reactive } from "vue";
export default function useAddItem(state) {
  const user = reactive({
    id: "",
    name: "",
  });
  const handleSubmit = () => {
    const userCopy = Object.assign({}, user);
    state.arr.push(userCopy);
    user.id = "";
    user.name = "";
  };
  return {
    user,
    handleSubmit,
  };
}
App.vue
<script setup>
import userRemoveItem from "./hooks/remove";
import useAddItem from "./hooks/add";
const { state, removeItem } = userRemoveItem();
const { user, handleSubmit } = useAddItem(state);
</script>
<template>
  <form @submit.prevent="handleSubmit">
    <input type="text" v-model="user.id" />
    <input type="text" v-model="user.name" />
    <input type="submit" />
  </form>
  <ul>
    <li
      v-for="(item, index) in state.arr"
      :key="item.id"
      @click="removeItem(index)"
    >
      {{ item.name }}
    </li>
  </ul>
</template>
5.4 toRef 和 toRefs
toRef 函数的作用:转换响应式对象中某个属性为单独响应式数据,并且转换后的值和之前是关联的(ref 函数也可以转换,但值非关联,后面详讲 ref 函数)。
需求
📝 在模板中渲染 name 和 age,实现代码如下:
<script setup>
import { reactive } from "vue";
const obj = reactive({
  name: "ifer",
  age: 10,
  address: "河南",
  sex: "男",
});
const updateName = () => {
  obj.name = "xxx";
};
</script>
<template>
  <div class="container">
    <h2>name: {{ obj.name }} age: {{ obj.age }}</h2>
    <button @click="updateName">修改数据</button>
  </div>
</template>
• 💊 问题 1:模板中都要使用 obj. 进行获取数据,麻烦;
• 💊 问题 2:明明模板中只用到了 name 和 age,却把整个 obj 进行了导出,性能浪费。
尝试解决
<script setup>
import { reactive } from "vue";
const obj = reactive({
  name: "ifer",
  age: 10,
  address: "河南",
  sex: "男",
});
// !解构出简单数据类型会失去响应式
let { name } = obj;
const updateName = () => {
  // obj.name = 'xxx' // 不响应
  name = "xxx"; // 不响应
};
</script>
<template>
  <div class="container">
    <h2>{{ name }}</h2>
    <button @click="updateName">修改数据</button>
  </div>
</template>
❗ 修改数据,发现视图并没有更新,也就是上面的操作导致数据丢失了响应式,丢失响应式的操作,常见的还有解构赋值等。
继续解决
<script setup>
import { reactive, toRef } from "vue";
const obj = reactive({
  name: "ifer",
  age: 10,
});
const name = toRef(obj, "name");
const updateName = () => {
  // 注意:需要使用 name.value 进行修改
  name.value = "xxx";
  // 对 obj.name 的修改也会影响视图的变化,即值是关联的
  // obj.name = 'xxx' // ok
};
</script>
<template>
  <div class="container">
    <h2>{{ name }}</h2>
    <button @click="updateName">修改数据</button>
  </div>
</template>
toRefs
⚒️ 作用:转换响应式对象中所有属性为单独响应式数据,并且转换后的值和之前是关联的。
📝 模板中需要写 obj.name、obj.age …很麻烦,期望能够直接能使用 name、age 属性。
<script setup>
import { reactive, toRefs } from "vue";
const obj = reactive({
  name: "ifer",
  age: 10,
});
const { name, age } = toRefs(obj);
const updateName = () => {
  obj.name = "xxx";
  obj.age = 18;
};
</script>
<template>
  <div class="container">
    <h2>{{ name }} {{ age }}</h2>
    <button @click="updateName">修改数据</button>
  </div>
</template>
5.5 ref 函数
ref 函数,常用于把简单数据类型包裹为响应式数据,注意 JS 中操作值的时候,需要加 .value 属性,模板中正常使用即可。
📑 实现一个点击计数的案例,效果如下:
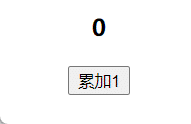
定义一个简单数据类型的响应式数据;
定义一个修改数字的方法。
<script setup>
import { ref } from "vue";
const count = ref(0);
const add = () => {
  count.value++;
};
</script>
<template>
  <h3>{{ count }}</h3>
  <button @click="add">累加1</button>
</template>
ref 也可以包裹复杂数据类型为响应式数据,Vue3.2 之后更建议使用 ref,性能更高,详见。
06_计算属性
基本用法
⚒️ 作用:computed 函数用来定义计算属性。
📌 需求:根据 firstName 和 lastName 的值计算出 fullName,效果如下图:

<script setup>
import { computed, reactive } from "vue";
const person = reactive({
firstName: "金山",
lastName: "办公",
});
person.fullName = computed(() => {
return person.firstName + " " + person.lastName;
});
// 也可以传入对象,目前和上面等价
/* person.fullName = computed({
get() {
return person.firstName + ' ' + person.lastName
},
}) */
</script>
<template>
<p>firstName: {{ person.firstName }}</p>
<p>lastName: {{ person.lastName }}</p>
<p>fullName: {{ person.fullName }}</p>
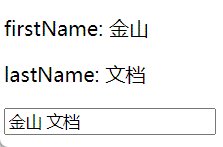
</template>高级用法
利用 set/get 高级语法,可以做到计算属性被修改。
<script setup>
import { computed, reactive } from "vue";
const person = reactive({
  firstName: "金山",
  lastName: "文档",
});
// 也可以传入对象,目前和上面等价
person.fullName = computed({
  get() {
    return person.firstName + " " + person.lastName;
  },
  set(value) {
    const newArr = value.split(" ");
    person.firstName = newArr[0];
    person.lastName = newArr[1];
  },
});
</script>
<template>
  <p>firstName: {{ person.firstName }}</p>
  <p>lastName: {{ person.lastName }}</p>
  <input type="text" v-model="person.fullName" />
</template>
07_样式处理
绑定 HTML class
我们可以给 :class (v-bind:class 的缩写) 传递一个对象来动态切换 class:
<script setup>
import { ref } from "vue";
const isActive = ref(true);
</script>

<template>
  <div :class="{ active: isActive }">Hello World</div>
</template>

<style scoped>
.active {
  color: teal;
}
</style>
上面的语法表示 active 是否存在取决于数据属性 isActive 的真假值。
绑定内联样式
:style 支持绑定 JavaScript 对象值,对应的是 HTML 元素的 style 属性:
<script setup>
import { ref } from "vue";
const activeColor = ref("red");
const fontSize = ref(30);
</script>
<template>
  <div :style="{ color: activeColor, fontSize: fontSize + 'px' }">
    Hello World
  </div>
</template>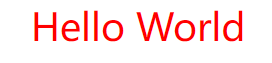
08_条件渲染
v-if
v-if 指令用于条件性地渲染一块内容,这块内容只会在指令的表达式返回真值时才被渲染。
<script setup>
import { ref } from "vue";
const awesome = ref(true);
const toggleAwesome = () => {
  awesome.value = !awesome.value;
};
</script>
<template>
  <h1 v-if="awesome">Vue is awesome!</h1>
  <button @click="toggleAwesome">toggle awesome</button>
</template>
v-else
可以使用 v-else 为 v-if 添加一个”else 区块”:
<script setup>
import { ref } from "vue";
const awesome = ref(true);
</script>
<template>
  <h1 v-if="awesome">Vue is awesome!</h1>
  <h1 v-else>Oh no 😢</h1>
  <button @click="awesome = !awesome">切换</button>
</template>
⚠️ 注意:
v-else元素必须紧跟在v-if或者v-else-if元素的后面,否则它将不会被识别。
v-else-if
v-else-if 提供的是相应于 v-if 的”else if 区块”,可以连续使用:
<script setup>
import { ref } from "vue";
const type = ref("B");
</script>
<template>
  <div v-if="type === 'A'">A 类型</div>
  <div v-else-if="type === 'B'">B 类型</div>
  <div v-else-if="type === 'C'">C 类型</div>
  <div v-else>不是 A/B/C</div>
</template>
⚠️ 和
v-else类似,v-else-if也必须紧跟在v-if或v-else-if后面。
在 template 上使用 v-if
因为 v-if 是一个指令,它必须依附于某个元素。但如果我们想切换不止一个元素呢?在这种情况下,我们可以在一个 <template> 元素上使用 v-if,这只是一个不可见的包装器元素,最后渲染的结果并不会包含这个 <template> 元素。
<script setup>
import { ref } from "vue";
const awesome = ref(true);
</script>
<template>
  <template v-if="awesome">
    <h1>标题</h1>
    <p>段落 1</p>
    <p>段落 2</p>
  </template>
</template>
v-show
另一个可以用来按条件显示一个元素的指令是 v-show:
<script setup>
import { ref } from "vue";
const isShow = ref(true);
</script>
<template>
  <h1 v-show="isShow">Hello!</h1>
  <button @click="isShow = !isShow">切换显示</button>
</template>
v-if vs v-show
| 特性 | v-if | v-show |
|---|---|---|
| 渲染方式 | 条件为 false 时,元素不渲染到 DOM | 条件为 false 时,元素仍渲染,只是设置 display: none |
| 切换开销 | 高(每次切换都涉及 DOM 的创建和销毁) | 低(只改变 CSS 属性) |
| 初始渲染开销 | 低(条件为 false 时不渲染) | 高(无论条件如何都会渲染) |
| 适用场景 | 运行时条件很少改变 | 需要频繁切换 |
使用建议
- 使用
v-if:条件在运行时很少改变,或者需要条件为 false 时完全不渲染(节省初始渲染开销) - 使用
v-show:需要频繁切换条件的场景(如标签页、折叠面板)
v-if 与 v-for
⚠️ 不推荐同时使用
v-if和v-for。
当两者同时存在于一个节点上时,v-if 的优先级比 v-else 更高,这意味着 v-if 将没有权限访问 v-for 里的变量:
<!-- 错误:v-if 没有访问 todo 的权限 -->
<li v-for="todo in todos" v-if="!todo.isComplete">
  {{ todo.name }}
</li>

<!-- 正确:使用 template 包裹 -->
<template v-for="todo in todos" :key="todo.id">
  <li v-if="!todo.isComplete">
    {{ todo.name }}
  </li>
</template>更多细节参见官方文档。
09_列表渲染
我们可以使用 v-for 指令基于一个数组来渲染一个列表,语法如下:
<script setup>
import { ref } from "vue";
const items = ref([{ message: "Foo" }, { message: "Bar" }]);
</script>
<template>
  <ul>
    <li v-for="item in items" :key="item.message">
      {{ item.message }}
    </li>
  </ul>
</template>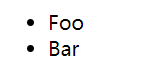
遍历对象
也可以使用 v-for 来遍历一个对象的所有属性:
<script setup>
import { reactive } from "vue";
const obj = reactive({
  title: "How to do lists in Vue",
  author: "Jane Doe",
  publishedAt: "2016-04-10",
});
</script>
<template>
  <ul>
    <li v-for="(value, key, index) in obj" :key="key">
      {{ index }}. {{ key }}: {{ value }}
    </li>
  </ul>
</template>
使用范围值
v-for 可以直接接受一个整数值,在这种场景下,会将该值基于 1 开始作为初始值:
<template>
  <span v-for="n in 10" :key="n">{{ n }}</span>
</template>
💡 注意此处
n的初值是从 1 开始,而非 0。
在 template 上使用 v-for
与模板上的 v-if 类似,你也可以在 <template> 标签上使用 v-for 来渲染一个包含多个元素的块:
<template>
  <ul>
    <template v-for="item in items" :key="item.id">
      <li>{{ item.name }}</li>
      <li class="divider" role="presentation"></li>
    </template>
  </ul>
</template>
数组更新检测
变更方法
Vue 能够侦听响应式数组的变更方法,并在它们被调用时触发相关的更新。这些方法包括:
push()- 在数组末尾添加元素pop()- 删除数组最后一个元素shift()- 删除数组第一个元素unshift()- 在数组开头添加元素splice()- 删除/插入/替换元素sort()- 排序reverse()- 反转
<script setup>
import { ref } from "vue";
const items = ref(["苹果", "香蕉", "橙子"]);

const addItem = () => {
  items.value.push("葡萄"); // 会触发视图更新
};

const removeFirst = () => {
  items.value.shift(); // 会触发视图更新
};

const sortItems = () => {
  items.value.sort(); // 会触发视图更新
};
</script>
<template>
  <ul>
    <li v-for="(item, index) in items" :key="index">{{ item }}</li>
  </ul>
  <button @click="addItem">添加</button>
  <button @click="removeFirst">删除第一个</button>
  <button @click="sortItems">排序</button>
</template>
替换一个数组
变更方法,顾名思义,就是会对调用它们的原数组进行变更。相对地,也有一些不可变 (immutable) 方法,例如 filter()、concat() 和 slice(),它们都不会更改原数组,而总是返回一个新数组。当遇到的是非变更方法时,我们需要将旧的数组替换为新的:
<script setup>
import { ref } from "vue";
const items = ref([1, 2, 3, 4, 5]);

// 正确:替换数组
const filterItems = () => {
  items.value = items.value.filter((item) => item > 2);
};

// 错误:直接赋值会失去响应式
const wrongWay = () => {
  // items.value = items.value.filter(...) // 这样是正确的
  // items = items.value.filter(...) // 错误!会失去响应式
};
</script>
<template>
  <ul>
    <li v-for="item in items" :key="item">{{ item }}</li>
  </ul>
  <button @click="filterItems">过滤大于2的数</button>
</template>
注意事项
Vue 对数组的响应式追踪是有限制的,以下操作不会触发视图更新:
<script setup>
import { ref } from "vue";
const items = ref(["a", "b", "c"]);

// ❌ 错误:通过索引直接设置值
const setByIndex = () => {
  items.value[0] = "x"; // 不会触发更新
};

// ✅ 正确:使用 splice 或重新赋值
const setByIndexCorrect = () => {
  items.value.splice(0, 1, "x"); // 会触发更新
  // 或
  // items.value = ["x", ...items.value.slice(1)];
};

// ❌ 错误:修改数组长度
const setLength = () => {
  items.value.length = 1; // 不会触发更新
};

// ✅ 正确:使用 splice
const setLengthCorrect = () => {
  items.value.splice(1); // 会触发更新
};
</script>
使用 key 的注意事项
key 的特殊 attribute 主要用在 Vue 的虚拟 DOM 算法中,在对比新旧节点时辨识 VNodes。
- 推荐:在使用
v-for时提供keyattribute,除非遍历输出的 DOM 内容非常简单(如不包含子组件或状态),或者是刻意依赖默认行为以获取性能提升。 - 不要:使用对象或数组之类的非基本类型值作为
v-for的 key,请用字符串或数值类型的值。
<!-- ✅ 推荐 -->
<li v-for="item in items" :key="item.id">{{ item.name }}</li>

<!-- ⚠️ 不推荐(但可行) -->
<li v-for="(item, index) in items" :key="index">{{ item.name }}</li>

<!-- ❌ 错误 -->
<li v-for="item in items" :key="item">{{ item.name }}</li>更多使用细节,参考官方文档。
10_事件处理
基本用法
可以使用 v-on 指令(简写为 @)来监听 DOM 事件,并在事件触发时执行一些 JavaScript 代码。
<script setup>
import { ref } from "vue";
const count = ref(0);
const say = () => {
  count.value++;
};
</script>
<template>
  <div :style="{ background: count % 2 ? 'tan' : 'teal' }"></div>
  <button @click="say('hello')">change color</button>
</template>
<style scoped>
div {
  width: 100px;
  height: 100px;
}
</style>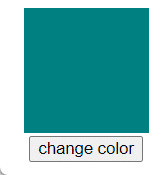
传递参数
传递普通参数
<script setup>
const say = (message) => {
  alert(message);
};
</script>
<template>
  <button @click="say('hello')">say hello</button>
  <button @click="say('bye')">say bye</button>
</template>
访问事件对象
使用特殊的 $event 变量访问原生事件对象:
<script setup>
const handleClick = (message, event) => {
  console.log(message); // 'hello'
  console.log(event.target); // 按钮元素
};
</script>
<template>
  <button @click="handleClick('hello', $event)">点击</button>
</template>
事件修饰符
Vue 为 v-on 提供了事件修饰符,用于处理常见的 DOM 事件细节。
常用修饰符
<!-- 阻止单击事件继续传播 -->
<a @click.stop="handleClick">阻止冒泡</a>

<!-- 提交事件不再重载页面 -->
<form @submit.prevent="handleSubmit">阻止默认行为</form>

<!-- 修饰符可以串联 -->
<a @click.stop.prevent="handleClick">串联使用</a>

<!-- 只有修饰符 -->
<form @submit.prevent></form>

<!-- 添加事件监听器时使用 capture 模式 -->
<div @click.capture="handleClick">capture模式</div>

<!-- 只当事件在该元素本身触发时触发回调 -->
<div @click.self="handleClick">self模式</div>

<!-- 点击事件将只会触发一次 -->
<button @click.once="handleClick">只触发一次</button>

<!-- 滚动事件的默认行为将立即触发 -->
<div @scroll.passive="handleScroll">passive模式</div>
修饰符执行顺序
修饰符的顺序很重要,相关代码会按顺序生成:
<!-- 先阻止冒泡,再阻止默认行为 -->
<a @click.stop.prevent="handleClick"></a>

<!-- 先阻止默认行为,再阻止冒泡 -->
<a @click.prevent.stop="handleClick"></a>
按键修饰符
在监听键盘事件时,我们经常需要检查特定的按键。
常用按键别名
<!-- 只有在 key 是 Enter 时调用 -->
<input @keyup.enter="submit" />

<!-- 其他常用按键 -->
<input @keyup.tab="nextInput" />
<input @keyup.delete="deleteItem" />
<input @keyup.esc="cancel" />
<input @keyup.space="addSpace" />
<input @keyup.up="moveUp" />
<input @keyup.down="moveDown" />
<input @keyup.left="moveLeft" />
<input @keyup.right="moveRight" />
系统修饰键
<!-- Ctrl + Click -->
<div @click.ctrl="handleClick">Ctrl + Click</div>

<!-- Alt + Enter -->
<input @keyup.alt.enter="clear" />

<!-- Ctrl + Shift + V -->
<input @keyup.ctrl.shift.86="paste" />

<!-- 只有 Ctrl 按下时触发 -->
<div @click.ctrl.exact="handleClick">仅Ctrl</div>
自定义按键别名
// 在 main.js 中定义
app.config.keyCodes = {
  v: 86,
  f1: 112,
  mediaPlayPause: 179,
  "arrow-up": [38, 87]
}
鼠标按钮修饰符
<!-- 鼠标左键 -->
<div @click.left="handleClick">左键</div>

<!-- 鼠标中键 -->
<div @click.middle="handleClick">中键</div>

<!-- 鼠标右键 -->
<div @click.right="handleClick">右键</div>
为什么在 HTML 中监听事件?
你可能注意到这种事件监听的方式违背了”关注点分离”的传统理念。但不必担心:
-
Vue 事件处理函数:所有的 Vue 事件处理函数都被绑定到当前视图的 ViewModel 上,不会导致任何维护困难。
-
解耦:当一个 ViewModel 被销毁时,所有的事件处理器都会自动被删除。
-
可读性:模板中直接看到事件绑定,更容易定位处理函数。
更多细节,参考官方文档
11_表单输入绑定
可以使用 v-model 指令在表单 <input>、<textarea> 及 <select> 元素上创建双向数据绑定。它会根据控件类型自动选取正确的方法来更新元素。
基本用法
文本输入框
<script setup>
import { ref } from "vue";
const message = ref("");
</script>
<template>
  <input v-model="message" placeholder="请输入内容" />
  <p>输入的内容:{{ message }}</p>
</template>
多行文本
<script setup>
import { ref } from "vue";
const message = ref("");
</script>
<template>
  <textarea v-model="message" placeholder="多行文本"></textarea>
  <p>输入的内容:</p>
  <p style="white-space: pre-line">{{ message }}</p>
</template>
💡 注意:在文本区域插值 (
<textarea>{{ text }}</textarea>) 将不会生效,请使用v-model代替。
复选框
单个复选框
<script setup>
import { ref } from "vue";
const checked = ref(false);
</script>
<template>
  <input type="checkbox" id="checkbox" v-model="checked" />
  <label for="checkbox">{{ checked ? "已选中" : "未选中" }}</label>
</template>
多个复选框绑定到数组
<script setup>
import { ref } from "vue";
const checkedNames = ref([]);
</script>
<template>
  <input type="checkbox" id="jack" value="Jack" v-model="checkedNames" />
  <label for="jack">Jack</label>
  <input type="checkbox" id="john" value="John" v-model="checkedNames" />
  <label for="john">John</label>
  <input type="checkbox" id="mike" value="Mike" v-model="checkedNames" />
  <label for="mike">Mike</label>
  <p>选中的人:{{ checkedNames }}</p>
</template>
单选按钮
<script setup>
import { ref } from "vue";
const picked = ref("");
</script>
<template>
  <input type="radio" id="one" value="One" v-model="picked" />
  <label for="one">One</label>
  <input type="radio" id="two" value="Two" v-model="picked" />
  <label for="two">Two</label>
  <p>选中:{{ picked }}</p>
</template>
下拉选择框
单选
<script setup>
import { ref } from "vue";
const selected = ref("");
</script>
<template>
  <select v-model="selected">
    <option disabled value="">请选择</option>
    <option value="a">A</option>
    <option value="b">B</option>
    <option value="c">C</option>
  </select>
  <p>选中:{{ selected }}</p>
</template>
💡 如果
v-model表达式的初始值不匹配任何一个选择项,<select>元素会渲染成”未选中”状态。在 iOS 中,这会导致用户无法选择第一项,因为这样的情况下 iOS 不会触发 change 事件。因此,建议提供一个空值的禁用选项。
多选
<script setup>
import { ref } from "vue";
const selected = ref([]);
</script>
<template>
  <select v-model="selected" multiple>
    <option value="a">A</option>
    <option value="b">B</option>
    <option value="c">C</option>
  </select>
  <p>选中:{{ selected }}</p>
</template>
用 v-for 渲染动态选项
<script setup>
import { ref } from "vue";
const selected = ref("a");
const options = ref([
  { text: "One", value: "a" },
  { text: "Two", value: "b" },
  { text: "Three", value: "c" },
]);
</script>
<template>
  <select v-model="selected">
    <option v-for="option in options" :value="option.value" :key="option.value">
      {{ option.text }}
    </option>
  </select>
  <p>选中:{{ selected }}</p>
</template>
值绑定
对于单选按钮、复选框和选择器选项,v-model 绑定的值通常是静态字符串(对于复选框也可以是布尔值):
<!-- 当选中时,`picked` 为字符串 "a" -->
<input type="radio" v-model="picked" value="a" />

<!-- 当选中时,`toggle` 为 true 或 false -->
<input type="checkbox" v-model="toggle" />

<!-- 当选中时,`selected` 为字符串 "abc" -->
<select v-model="selected">
  <option value="abc">ABC</option>
</select>
复选框的 true-value 和 false-value
<script setup>
import { ref } from "vue";
const toggle = ref("no");
</script>
<template>
  <input
    type="checkbox"
    v-model="toggle"
    true-value="yes"
    false-value="no"
  />
  <p>{{ toggle }}</p>
</template>
true-value和false-value是 Vue 特有的属性,仅会和v-model一起生效。
修饰符
.lazy
默认情况下,v-model 会在 input 事件后同步输入框的值。可以添加 lazy 修饰符,改为在 change 事件后同步:
<!-- 在 change 事件后同步更新 -->
<input v-model.lazy="message" />
.number
如果想将用户输入自动转换为数字,可以添加 number 修饰符:
<script setup>
import { ref } from "vue";
const age = ref("");
</script>
<template>
  <input v-model.number="age" type="number" />
  <p>类型:{{ typeof age }}</p>
</template>
💡 当
type="number"时,HTML 输入框的值也总是会返回字符串。如果该值无法被parseFloat()解析,则会返回原始值。
.trim
自动去除用户输入内容中两端的空格:
<input v-model.trim="message" />v-model 的原理
v-model 本质上是语法糖,它等价于:
<input
  :value="text"
  @input="event => text = event.target.value"
/>
组件上的 v-model 也可以这样展开:
<CustomInput
  :modelValue="searchText"
  @update:modelValue="newValue => searchText = newValue"
/>更多细节,参考官方文档
12_生命周期
概念
组件从创建到销毁的整个阶段被称为组件的生命周期,每个阶段对应的有特定的钩子函数,利用这些函数给我们在特定阶段做对应操作提供了时机。
演示
• 组合 API 生命周期写法,其实 选项 API 的写法在 Vue3 中也是支持。
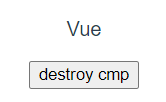
• Vue3(组合 API)常用的生命周期钩子有 7 个,分别是 setup、onBeforeMount、onMounted、onBeforeUpdate、onUpdated、onBeforeUnmount、onUnmounted,除了 setup 外,可以多次使用同一个钩子,执行顺序和书写顺序相同。
App.vue
<script setup>
import HelloWorld from "./components/HelloWorld.vue";
import { reactive } from "vue";
const state = reactive({
  bBar: true,
});
</script>
<template>
  <hello-world v-if="state.bBar" />
  <button @click="state.bBar = !state.bBar">{{ state.bBar ? 'destroy' : 'create' }} cmp</button>
</template>
HelloWorld.vue
<script setup>
import {
  onBeforeMount,
  onMounted,
  onBeforeUpdate,
  onUpdated,
  onBeforeUnmount,
  onUnmounted,
  reactive,
} from "vue";
const state = reactive({
  msg: "Hello World",
});

onBeforeMount(() => {
  console.log("onBeforeMount");
});
onMounted(() => {
  console.log("onMounted");
});
onBeforeUpdate(() => {
  console.log("onBeforeUpdate");
});
onUpdated(() => {
  console.log("onUpdated");
});
onBeforeUnmount(() => {
  console.log("onBeforeUnmount");
});
onUnmounted(() => {
  console.log("onUnmounted");
});
</script>

<template>
  <p>{{ state.msg }}</p>
  <button @click="state.msg = 'xxx'">update msg</button>
</template>
练习
📝 记录鼠标位置,实现步骤如下:
定义一个响应式数据对象,包含 x 和 y 属性;
在组件渲染完毕后,监听 document 的鼠标移动事件;
指定 move 函数为事件对应回调,在函数中修改坐标;
组件销毁时,解绑事件。
<script setup>
import { onMounted, onUnmounted, reactive } from "vue";
// Hook:本质是一个函数,把 setup 中使用的 composition API 逻辑进行了提取/封装,类似于 Vue2 中的 mixin。
// 优势:利于代码复用,使 setup 中的逻辑更加清晰。
const useMouse = () => {
  const mouse = reactive({
    x: 0,
    y: 0,
  });
  const move = (e) => {
    mouse.x = e.pageX;
    mouse.y = e.pageY;
  };
  onMounted(() => {
    document.addEventListener("mousemove", move);
  });
  onUnmounted(() => {
    document.removeEventListener("mousemove", move);
  });
  return mouse;
};
const mouse = useMouse();
</script>
<template>
  <div>x: {{ mouse.x }} y: {{ mouse.y }}</div>
</template>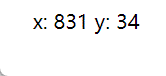
13_侦听器
13.1 监听 ref 数据
<script setup>
import { watch, ref } from "vue";
const age = ref(18);
// 监听 ref 数据 age,会触发后面的回调,不需要 .value
watch(age, (newValue, oldValue) => {
  console.log(newValue, oldValue);
});
</script>

<template>
  <p>{{ age }}</p>
  <button @click="age++">click</button>
</template>
也可以监听多个 ref 数据。
<script setup>
import { watch, ref } from "vue";
const age = ref(18);
const num = ref(0);

const handleClick = () => {
  age.value++;
  num.value++;
};
// 数组里面是 ref 数据
watch([age, num], (newValue, oldValue) => {
  console.log(newValue, oldValue);
});
</script>

<template>
  <p>age: {{ age }} num: {{ num }}</p>
  <button @click="handleClick">click</button>
</template>
13.2 立即触发监听
通过第 3 个参数,配置 immediate 为 true,可以进行立即监听。
<script setup>
import { watch, ref } from "vue";
const age = ref(18);

const handleClick = () => {
  age.value++;
};

watch(
  age,
  (newValue, oldValue) => {
    console.log(newValue, oldValue); // 18 undefined
  },
  {
    immediate: true,
  }
);
</script>

<template>
  <p>{{ age }}</p>
  <button @click="handleClick">click</button>
</template>
13.3 开启深度监听
💊 问题:修改 ref 对象里面的数据并不会触发监听,说明 ref 并不是默认开启 deep 的。
<script setup>
import { watch, ref } from "vue";
const obj = ref({
  hobby: {
    eat: "西瓜",
  },
});
watch(obj, (newValue, oldValue) => {
  console.log(newValue === oldValue);
});
</script>

<template>
  <p>{{ obj.hobby.eat }}</p>
  <button @click="obj.hobby.eat = '面条'">修改 obj.hobby.eat</button>
</template>
🎉 1. 解决:当然直接修改整个对象的话肯定是会被监听到的(注意模板中对 obj 的修改,相当于修改的是 obj.value)。
<script setup>
import { watch, ref } from "vue";
const obj = ref({
  hobby: {
    eat: "西瓜",
  },
});
watch(obj, (newValue, oldValue) => {
  console.log(newValue, oldValue);
  console.log(newValue === oldValue);
});
</script>

<template>
  <p>{{ obj.hobby.eat }}</p>
  <button @click="obj = { hobby: { eat: '面条' } }">修改 obj</button>
</template>
🎉 2. 解决:开启深度监听 ref 数据。
<script>
watch(
  obj,
  (newValue, oldValue) => {
    console.log(newValue, oldValue);
    console.log(newValue === oldValue);
  },
  {
    deep: true,
  }
);
</script>
13.4 监听 reactive
注意:监听 reactive 数据时,强制开启了深度监听,且配置无效;监听对象的时候 newValue 和 oldValue 是全等的。
<script setup>
import { watch, reactive } from "vue";
const obj = reactive({
  name: "ifer",
  hobby: {
    eat: "西瓜",
  },
});
watch(obj, (newValue, oldValue) => {
  // 注意1:监听对象的时候,新旧值是相等的
  // 注意2:强制开启深度监听,配置无效
  console.log(newValue === oldValue); // true
});
</script>

<template>
  <p>{{ obj.hobby.eat }}</p>
  <button @click="obj.hobby.eat = '面条'">click</button>
</template>
• 想让 ref 内部数据的修改被观测到,除了前面学习的开启深度监听,还可以通过监听 ref.value 来实现同样的效果;
• 因为 ref.value 是一个 reactive,可以通过 isReactive 方法来证明。
<script setup>
import { watch, ref } from "vue";
const obj = ref({
  hobby: {
    eat: "西瓜",
  },
});
watch(obj.value, (newValue, oldValue) => {
  console.log(newValue, oldValue);
  console.log(newValue === oldValue);
});
</script>

<template>
  <p>{{ obj.hobby.eat }}</p>
  <button @click="obj.hobby.eat = '面条'">修改 obj</button>
</template>
13.5 监听普通数据
监听响应式对象中的某一个普通属性值,要通过函数返回的方式进行(如果返回的是对象/响应式对象,修改内部的数据需要开启深度监听)。
<script setup>
import { watch, reactive } from "vue";
const obj = reactive({
  hobby: {
    eat: "西瓜",
  },
});
// 不叫普通属性值,是一个 reactive
/* watch(obj.hobby, (newValue, oldValue) => {
  console.log(newValue, oldValue)
  console.log(newValue === oldValue)
}) */
// 叫普通属性值
watch(
  () => obj.hobby.eat,
  (newValue, oldValue) => {
    console.log(newValue, oldValue);
    console.log(newValue === oldValue);
  }
);
</script>

<template>
  <p>{{ obj.hobby.eat }}</p>
  <button @click="obj.hobby.eat = '面条'">修改 obj</button>
</template>
监听 ref 数据的另一种写法。
<template>
  <p>{{ age }}</p>
  <button @click="age++">click</button>
</template>

<script>
import { watch, ref } from "vue";
export default {
  name: "App",
  setup() {
    const age = ref(18);
    // 监听 ref 数据 age,会触发后面的回调,不需要 .value
    /* watch(age, (newValue, oldValue) => {
      console.log(newValue, oldValue);
    }); */
    // 另一种写法,函数返回一个普通值
    watch(
      () => age.value,
      (newValue, oldValue) => {
        console.log(newValue, oldValue);
      }
    );
    return { age };
  },
};
</script>
13.6 watchEffect
<script setup>
import { reactive, watchEffect } from "vue";
const obj = reactive({
  hobby: {
    eat: "西瓜",
  },
});
// 叫普通属性值
/* watch(obj, (newValue, oldValue) => {
  console.log(newValue, oldValue)
  console.log(newValue === oldValue)
}) */

watchEffect(() => {
  // 1. 不指定监视哪一个,这里面用到了谁就监听谁
  // 2. 第一次的时候肯定会执行
  // 例如对 obj.hobby.eat 的修改,由于这里用到了 obj.hobby.eat,则会执行
  // !注意如果这里用的是 obj 则不会被执行
  console.log(obj.hobby.eat);
});
</script>

<template>
  <p>{{ obj.hobby.eat }}</p>
  <button @click="obj.hobby.eat = '面条'">修改 obj</button>
</template>
14_关于组件
14.1 DOM 或模板引用
组件允许我们将 UI 划分为独立的、可重用的部分,并且可以对每个部分进行单独的思考。在实际应用中,组件常常被组织成层层嵌套的树状结构。

通常来说,一个 .vue 文件就是一个组件,它有三部分组成,分别是 script、template、style,例如下面就定义了一个 Hello.vue 组件:
<script setup></script>
<template>
  <div>Hello</div>
</template>
<style scoped></style>
一个组件可以被使用多次,互不影响,例如通过下面的方式可以使用组件:
<script setup>
import Hello from './Hello.vue'
</script>
<template>
  <Hello/>
  <Hello/>
</template>
📝 获取单个 DOM
<script setup>
import { onMounted, ref } from "vue";
// #1
const dom = ref(null);
onMounted(() => {
  // #3
  console.log(dom.value);
});
</script>
<template>
  <!-- #2 -->
  <div ref="dom">我是box</div>
</template>
📝 配合 v-for 循环获取一组 DOM
<script setup>
import { onMounted } from "vue";
// #1
const domList = [];
// #2
const setDom = (el) => {
  domList.push(el);
};
onMounted(() => {
  // #4
  console.log(domList);
});
</script>
<template>
  <ul>
    <!-- #3 -->
    <li v-for="i in 4" :key="i" :ref="setDom">第 {{ i }} li</li>
  </ul>
</template>
💊 问题:有数据更新的时候,domList 会越来越多
<script setup>
import { onMounted, ref } from "vue";
const domList = [];
const setDom = (el) => {
  domList.push(el);
};
onMounted(() => {
  console.log(domList);
});

// 点击计数
const num = ref(1);
const handleClick = () => {
  num.value++;
  console.log(domList);
};
</script>

<template>
  <ul>
    <li v-for="i in 4" :key="i" :ref="setDom">第 {{ i }} li</li>
  </ul>
  <div>
    <h3>{{ num }}</h3>
    <button @click="handleClick">+1</button>
  </div>
</template>
🎉 解决:onBeforeUpdate 的时候清空 domList 即可
<script setup>
import { onMounted, ref, onBeforeUpdate } from "vue";
let domList = [];
const setDom = (el) => {
  domList.push(el);
};
onMounted(() => {
  console.log(domList);
});

onBeforeUpdate(() => (domList = []));
// 点击计数
const num = ref(1);
const handleClick = () => {
  num.value++;
  console.log(domList);
};
</script>

<template>
  <ul>
    <li v-for="i in 4" :key="i" :ref="setDom">第 {{ i }} li</li>
  </ul>
  <hr />
  <h3>{{ num }}</h3>
  <button @click="handleClick">+1</button>
</template>
14.2 组件父子通信
父传子
App.vue
<template>
  <h1>父组件</h1>
  <p>{{ money }}</p>
  <hr />
  <Son :money="money" @change-money="updateMoney" />
</template>
<script setup>
import { ref } from "vue";
import Son from "./Son.vue";
const money = ref(100);
// #1 父组件准备修改数据的方法并提供给子组件
const updateMoney = (newMoney) => {
  money.value -= newMoney;
};
</script>
Son.vue
<template>
  <h1>子组件</h1>
  <p>{{ money }}</p>
  <button @click="changeMoney(1)">花 1 元</button>
</template>
<script setup>
defineProps({
  money: {
    type: Number,
    default: 0,
  },
});
const emits = defineEmits(["change-money"]);
const changeMoney = (m) => {
  // #2 子组件通过 emit 进行触发
  emits("change-money", m);
};
</script>
14.3 v-model
基本操作
在组件上,Vue3 中的 v-model 完整写法如下:
<Son :modelValue="msg" @update:modelValue="msg=$event" />App.vue
<script setup>
import { ref } from "vue";
import Son from "./Son.vue";
const count = ref(10);
</script>

<template>
  <h2>count: {{ count }}</h2>
  <hr />
  <Son :modelValue="count" @update:modelValue="count = $event" />
  <!-- <Son v-model="count" /> -->
</template>
Son.vue
<script setup>
defineProps({
  modelValue: {
    type: Number,
    default: 0,
  },
});
</script>

<template>
  <h2>子组件 {{ modelValue }}</h2>
  <button @click="$emit('update:modelValue', 100)">改变 count</button>
</template>
传递多个
App.vue
<template>
  <h2>count: {{ count }} age: {{ age }}</h2>
  <hr />
  <Son v-model="count" v-model:age="age" />
</template>
<script setup>
import { ref } from "vue";
import Son from "./Son.vue";
const count = ref(10);
const age = ref(18);
</script>
Son.vue
<script setup>
defineProps({
  modelValue: {
    type: Number,
    default: 0
  },
  age: {
    type: Number,
    default: 18
  }
})
</script>
<template>
  <h2>子组件 {{ modelValue }} {{ age }}</h2>
  <button @click="$emit('update:modelValue', 100)">改变 count</button>
  <button @click="$emit('update:age', 19)">改变 age</button>
</template>
14.4 依赖注入
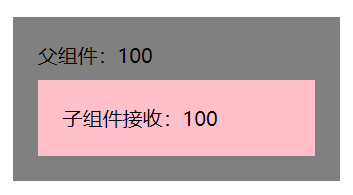
📌 掌握使用 provide 函数和 inject 函数完成跨层级组件通讯。
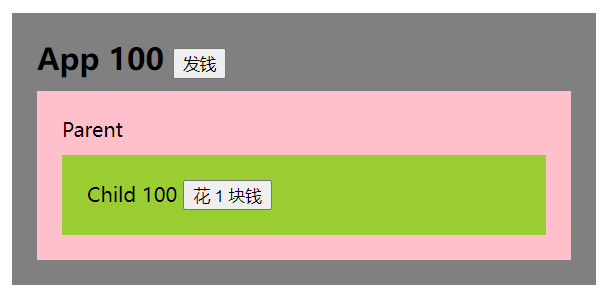
📝 把 App.vue 中的数据传递给孙组件 Child.vue。
App.vue
<script setup>
import { provide, ref } from "vue";
import Parent from "./Parent.vue";
// 提供数据
const money = ref(100);
provide("money", money);
// 提供修改数据的方法
const changeMoney = (m) => (money.value -= m);
provide("changeMoney", changeMoney);
</script>

<template>
  <div class="container">
    <h2>App {{ money }}</h2>
    <button @click="money = 1000">发钱</button>
    <hr />
    <Parent />
  </div>
</template>
Parent.vue
<script setup>
import Child from "./Child.vue";
</script>
<template>
  <div>
    Parent
    <hr />
    <Child />
  </div>
</template>
Child.vue
<script setup>
import { inject } from "vue";
const money = inject("money");
const changeMoney = inject("changeMoney");
</script>

<template>
  <div>
    Child
    <p>{{ money }}</p>
    <button @click="changeMoney(1)">花 1 块钱</button>
  </div>
</template>
15_其他特性
Fragment
-
Vue2 中组件必须有一个跟标签;
-
Vue3 中组件可以没有根标签,其内部会将多个标签包含在一个 Fragment 虚拟元素中;
-
好处:减少标签层级和内存占用。
Teleport
作用
传送,能将特定的 HTML 结构(一般是嵌套很深的)移动到指定的位置,解决 HTML 结构嵌套过深造成的样式影响或不好控制的问题。
需求
📑 在 Child 组件点击按钮进行弹框。
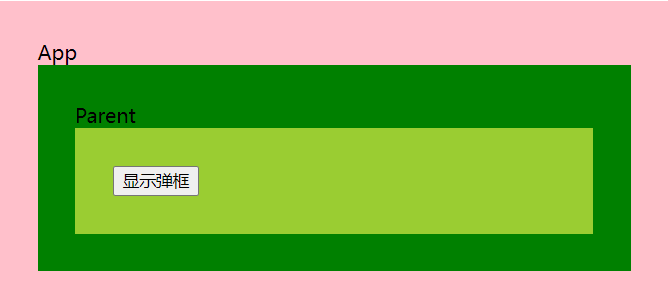
Child.vue
<script setup>
import Dialog from "./Dialog.vue";
const bBar = ref(false);
const handleDialog = () => {
  bBar.value = !bBar.value;
};
</script>

<template>
  <div class="child">
    <dialog v-if="bBar" />
    <button @click="handleDialog">显示弹框</button>
  </div>
</template>
实现
<template>
  <div class="child">
    <teleport to="body">
      <dialog v-if="bBar" />
    </teleport>
    <button @click="handleDialog">显示弹框</button>
  </div>
</template>
Suspense
异步组件加载期间,可以使用此组件渲染一些额外的内容,增强用户体验。
异步组件
<script setup>
// 静态引入 => 等待所有子组件加载完再统一渲染
// import Test from './Test.vue'
// 动态/异步引入
import { defineAsyncComponent } from "vue";
const Test = defineAsyncComponent(() => import("./Test.vue"));
</script>
<template>
  <div class="app">
    App
    <hr />
    <Test />
  </div>
</template>
优化代码
<script setup>
// 静态引入 => 等待所有子组件加载完再统一渲染
// import Test from './Test.vue'
// 动态/异步引入
import { defineAsyncComponent } from "vue";
const Test = defineAsyncComponent(() => import("./Test.vue"));
</script>
<template>
  <div class="app">
    App
    <Suspense>
      <template v-slot:default>
        <Test />
      </template>
      <template v-slot:fallback>
        <div>loading...</div>
      </template>
    </Suspense>
  </div>
</template>
defineExpose
-
标准组件写法中,父组件通过 ref 拿到子组件实例,并可以直接访问子组件中的 data 和 method;
-
script setup 模式下,data 和 method 只能给当前组件的 template 使用,外界通过 ref 无法访问;
-
处理:需要手动的通过 defineExpose 进行暴露。
App.vue
<script setup>
import { ref, nextTick } from "vue";
import Child from "./Child.vue";
const childRef = ref(null);
nextTick(() => {
  childRef.value.updatePerson("xxx", 20);
});
</script>
<template>
  <Child ref="childRef" />
</template>
Child.vue
<script setup>
import { reactive } from "vue";
const person = reactive({
  name: "ifer",
  age: 18,
});
const updatePerson = (name, age) => {
  person.name = name;
  person.age = age;
};
// 注意是 defineExpose,不要打成 defineProps 了
defineExpose({
  updatePerson,
});
</script>
<template>
  <h2>name: {{ person.name }} age: {{ person.age }}</h2>
</template>
useSlots 和 useAttrs
⚒️ 通过 useSlots 和 useAttrs 可以获取到插槽信息和非 props 属性。
App.vue
<script setup>
import Child from "./Child.vue";
</script>
<template>
  <Child>
    <!-- 默认插槽 -->
    <h2>默认插槽</h2>
    <!-- 具名插槽 -->
    <template #title>
      <h2>具名插槽</h2>
    </template>
    <!-- 作用域插槽 -->
    <template #footer="{ person }">
      <h2>通过作用域插槽获取到的数据:{{ person.name }}</h2>
    </template>
  </Child>
</template>
Child.vue
<script setup>
import { reactive, useSlots } from "vue";
const slots = useSlots();
const person = reactive({
  name: "ifer",
  age: 18,
});
// 可以拿到插槽相关的信息
console.log(slots);
</script>
<template>
  <slot />
  <slot name="title" />
  <slot name="footer" :person="person" />
</template>
CSS 变量注入
<script setup>
import { reactive } from "vue";
const state = reactive({
  color: "pink",
});
</script>
<template>
  <h2>Hello Vue3</h2>
</template>
<style scoped>
h2 {
  /* 可以使用 v-bind 绑定变量 */
  color: v-bind("state.color");
}
</style>
原型绑定与使用
main.js
import { createApp } from "vue";
import App from "./App.vue";
const app = createApp(App);
app.config.globalProperties.year = "再见 2021,你好 2022~~";
app.mount("#app");
App.vue
<script setup>
import { getCurrentInstance } from "vue";
const { proxy } = getCurrentInstance();
</script>
<template>
  <h1>{{ proxy.year }}</h1>
</template>
对 await 支持
<script setup>
const r = await fetch("https://autumnfish.cn/api/joke");
const d = await r.text();
console.log(d);
</script>
<template>
  <h1>{{ proxy.year }}</h1>
</template>
defineOptions
<template>
  <div>Hello</div>
</template>

<script setup>
defineOptions({
  name: 'HelloCmp'
})
</script>
customRef
作用:创建一个自定义的 ref,并对其依赖项跟踪和更新触发进行显式控制,文档。

使用 ref 完成双向数据绑定的效果。
<script setup>
import { ref } from "vue";
let keyword = ref("vue");
</script>
<template>
  <input type="text" v-model="keyword" />
  <p>{{ keyword }}</p>
</template>
customRef 的基本语法。
<script setup>
import { customRef } from "vue";
// 本质是函数,毛坯房、手动挡
function myRef(value) {
  return customRef(() => {
    return {
      get() {
        // 读的时候触发,模板中读了 2 次
        console.log(1);
        return value;
      },
      set(newValue) {
        // 有人改会触发
        console.log(newValue);
      },
    };
  });
}
const keyword = myRef("vue");
</script>
<template>
  <input type="text" v-model="keyword" />
  <p>{{ keyword }}</p>
</template>
get/set 的使用。
<script setup>
import { customRef } from "vue";
// 本质是函数,毛坯房
function myRef(value) {
  return customRef(() => {
    return {
      get() {
        // 读的时候触发,模板中读了 2 次
        console.log(1);
        return value;
      },
      set(newValue) {
        // 有人改会触发
        // console.log(newValue)
        // 改了是改了,get 并没有触发
        value = newValue;
      },
    };
  });
}
const keyword = myRef("vue");
</script>

<template>
  <input type="text" v-model="keyword" />
  <p>{{ keyword }}</p>
</template>
track 追踪数据的变化和 trigger 触发视图更新。
进行防抖的处理。shallowReactive 和 shallowRef
通过 reactive 和 ref 创建出来的数据都是递归劫持的,如果只想劫持第一层的变化可以使用 shallowReactive 或 shallowRef。
测试 shallowReactive 的使用如下。
<script setup>
import { shallowReactive } from "vue";
const state = shallowReactive({
  age: 18,
  a: {
    b: {
      c: {
        d: "Hello World",
      },
    },
  },
});
const handleChange = () => {
  // 只有第一层是响应式的,可以通过打印观察到
  // console.log(state);
  // 第一层的更新会影响到后面(注意 state.age 必须在模板当中使用才会触发更新)
  state.age = 19;
  // 如果没有上面的代码直接下面这样写界面是不会更新的
  state.a.b.c.d = "xxx";
};
</script>
<template>
  <p>{{ state.age }}</p>
  <p>{{ state.a.b.c.d }}</p>
  <button @click="handleChange">change</button>
</template>
shallowRef: 如果传入的是基本类型和 ref 没区别,传入的是对象则不是响应式的(不会再借助 reactive 函数了)。
<script setup>
import { shallowRef } from "vue";
const state = shallowRef({
  age: 18,
});
const handleChange = () => {
  // state.value.age = 19 // 非响应
  state.value = { age: 19 }; // 响应
  // triggerRef(state) // 也可以通过 triggerRef 来主动触发视图更新
};
</script>

<template>
  <p>{{ state.age }}</p>
  <button @click="handleChange">change</button>
</template>
readonly 和 shallowReadonly
<script setup>
import { readonly } from "vue";

const origin = {
  name: "ifer",
};
const state = readonly(origin);
const handleClick = () => {
  state.name = "xxx";
  console.log(state.name); // 'ifer'
  // 思考和 const 的差异?
  // const 内容可以改,readonly 内容都不可以改
};
</script>
<template>
  <p>{{ state.name }}</p>
  <button @click="handleClick">click</button>
</template>
toRaw 和 markRaw
toRaw: 返回 reactive 或 readonly 代理的原始对象,对这个原始对象的修改不会引起页面更新。
<script setup>
import { reactive, readonly, toRaw } from "vue";
const origin = {
  name: "ifer",
};
// origin 和 state1 的关系:state1 是根据 origin 生成的响应式对象,两者的修改会相互影响,但对 origin 的修改不是响应式的
const state1 = reactive(origin);
const state2 = readonly(origin);

console.log(toRaw(state1) === toRaw(state2)); // true
console.log(toRaw(state1) === origin); // true
</script>
<template>Hello World</template>
markRaw: readonly 是改都没改,这 markRaw 是改了没有响应式效果。
a,作用:标记一个对象,使其永远不会再成为响应式对象。
b,场景:有些值不应被设置为响应式的,例如复杂的第三方类库等;当渲染具有不可变数据源的大列表时,跳过响应式转换可以提高性能。
<script setup>
import { reactive, markRaw } from "vue";
let obj = {
  name: "ifer",
  age: 18,
};
// obj 将不被追踪,无法成为响应式数据
// obj = markRaw(obj);
markRaw(obj);
const state = reactive(obj);
const handleClick = () => {
  state.name = "xxx";
};
</script>

<template>
  <p>{{ state }}</p>
  <button @click="handleClick">click</button>
</template>
其他变更
参考 Vue3 迁移指南
-
全局 API 的变更,链接;
-
data 只能是函数,链接;
-
自定义指令 API 和组件保持一致,链接;
-
keyCode 作为 v-on 修饰符被移除、移除 v-on.native 修饰符、filters 被移除,链接;
-
on、on、off、$once 被移除,链接;
-
过渡类名的更改,链接;
-
…
16_路由学习
16.1 基础入门
创建项目
npm create vite@latest my-vue-app -- --template vue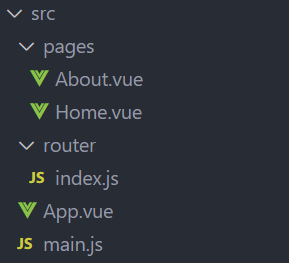
安装路由
npm install vue-router创建路由组件和映射关系
pages/Home.vue、pages/About.vue
<template>
  <h2>Home</h2>
</template>
配置路由映射关系,router/index.js
import Home from "../pages/Home.vue";
import About from "../pages/About.vue";

const routes = [
  {
    path: "/",
    redirect: "/home",
  },
  {
    path: "/home",
    component: Home,
  },
  {
    path: "/about",
    component: About,
  },
];
创建路由实例
通过 createRouter 创建路由对象并配置 history 和 routes。
import { createRouter, createWebHashHistory } from "vue-router";

import Home from "../pages/Home.vue";
import About from "../pages/About.vue";

const routes = [
  {
    path: "/",
    redirect: "/home",
  },
  {
    path: "/home",
    component: Home,
  },
  {
    path: "/about",
    component: About,
  },
];

const router = createRouter({
  history: createWebHashHistory(),
  routes,
});

export default router;
注册路由实例
在 main.js 中注册路由。
import { createApp } from 'vue'
import App from './App.vue'
import router from './router/index'
const app = createApp(App)
app.use(router)
app.mount('#app')
指定路由出口
在 App.vue 中通过 router-view 指定路由出口。
<template>
  <div>
    <ul>
      <li>
        <router-link to="/home">home</router-link>
      </li>
      <li>
        <router-link to="/about">about</router-link>
      </li>
    </ul>
    <router-view></router-view>
  </div>
</template>
配置懒加载
const routes = [
  // ...
  {
    path: "/about",
    component: () => import('../pages/About.vue'),
  },
];
16.2 命名路由
通过 name 属性可以给路由配置对象起名字,这有如下优点:
-
没有硬编码的 URL;
-
params 的自动编码/解码;
-
防止你在 url 中出现打字错误;
-
绕过路径排序(如显示一个)。
const routes = [
  {
    path: "/",
    redirect: "/home",
  },
  {
    path: "/home",
    component: Home,
    name: 'Home'
  },
  {
    path: "/about",
    component: About,
    name: 'About'
  },
];
16.3 路由导航
声明式导航
App.vue
<template>
  <!-- <router-link to="/home">首页</router-link>
  <router-link to="/about">关于</router-link> -->
  <router-link :to="{ name: 'Home' }">首页</router-link>
  <router-link :to="{ name: 'About' }">关于</router-link>
  <router-view></router-view>
</template>
编程式导航
字符串模式。
<script setup>
import { useRouter } from "vue-router";
const router = useRouter();

const goHome = () => {
  router.push("/home");
};
const goAbout = () => {
  router.push("/about");
};
</script>
<template>
  <div>
    <span @click="goHome">首页</span>
    <span @click="goAbout">关于</span>
  </div>
  <router-view></router-view>
</template>
对象模式。
<script setup>
import { useRouter } from "vue-router";
const router = useRouter();

const goHome = () => {
  router.push({
    path: '/home'
  });
};
const goAbout = () => {
  router.push({
    path: '/about'
  });
};
</script>
<template>
  <div>
    <span @click="goHome">首页</span>
    <span @click="goAbout">关于</span>
  </div>
  <router-view></router-view>
</template>
命名式路由模式。
<script setup>
import { useRouter } from "vue-router";
const router = useRouter();

const goHome = () => {
  router.push({
    name: 'Home'
  });
};
const goAbout = () => {
  router.push({
    name: 'About'
  });
};
</script>
<template>
  <div>
    <span @click="goHome">首页</span>
    <span @click="goAbout">关于</span>
  </div>
  <router-view></router-view>
</template>
历史记录
声明式导航。
<template>
  <div>
    <router-link replace to="/home">首页</router-link>
    <router-link replace to="/about">关于</router-link>
  </div>
  <router-view></router-view>
</template>
编程式导航。
<script setup>
import { useRouter } from "vue-router";
const router = useRouter();

const goHome = () => {
  router.replace('/home');
};
const goAbout = () => {
  router.replace('/about');
};
</script>
<template>
  <div>
    <span @click="goHome">首页</span>
    <span @click="goAbout">关于</span>
  </div>
  <router-view></router-view>
</template>
横跨历史。
// 前进,数量不限于 1
router.go(1)
// 后退
router.back()
16.4 路由传参
query 路由传参
App.vue
<script setup>
import { useRouter } from "vue-router";

const router = useRouter();

const goHome = () => {
  router.push({
    path: "/",
    query: { age: 18 },
  });
};

const goAbout = () => {
  router.push("/about");
};
</script>
<template>
  <div>
    <span @click="goHome">首页</span>
    <span @click="goAbout">关于</span>
  </div>
  <router-view></router-view>
</template>
Home.vue
<script setup>
import { useRoute } from 'vue-router';

const route = useRoute()
</script>
<template>
  <h2>Home: {{ route.query.age || '未知' }}</h2>
</template>
动态路由传参
注意 params 传参只能配合 name 跳转使用,path 无效,在 vue-router4.x 中被废弃。
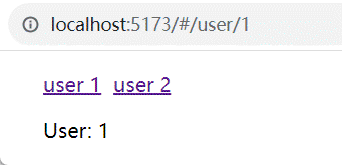
router/index.js
const routes = [
  {
    path: "/user/:id",
    component: () => import('../pages/User.vue'),
  },
];
pages/User.vue
<script setup>
import { useRoute } from 'vue-router';

const route = useRoute()
</script>
<template>
  <div>User: {{route.params.id}}</div>
</template>
App.vue
<template>
<div>
<ul>
<li>
<router-link to="/user/1">user 1</router-link>
<router-link to="/user/2">user 2</router-link>
</li>
</ul>
<router-view></router-view>
</div>
</template>16.5 404 路由
如何配置 NotFound 路由?
router/index.js
const routes = [
  // ...
  {
    path: "/:pathMatch(.*)*",
    component: () => import('../pages/NotFound.vue')
  },
];
pages/NotFound.vue
<script setup>
import { useRoute } from 'vue-router';
const route = useRoute()
</script>
<template>
  <div>NotFound: {{route.params.pathMatch}}</div>
</template>
16.6 路由嵌套
router/index.js
const routes = [
  // ...
  {
    path: "/",
    redirect: "/home",
  },
  {
    path: "/home",
    component: Home,
    children: [
      {
        path: "",
        redirect: "/home/product",
      },
      {
        path: "product",
        component: () => import("../pages/HomeProduct.vue"),
      },
    ],
  },
];
pages/Home.vue
<template>
  <h2>Home</h2>
  <router-view></router-view>
</template>
16.7 命名视图
命名视图可以在同一级(同一个组件)中展示更多的路由视图,而不是嵌套显示。 命名视图可以让一个组件中具有多个路由渲染出口,类似于“具名插槽”,并且视图的默认名称也是 default。
router/index.js
const routes = [
  // ...
  {
    path: "/home",
    components: {
      default: () => import("../pages/Menu.vue"),
      header: () => import("../pages/Header.vue"),
      content: () => import("../pages/Content.vue"),
    },
    name: "Home",
  },
];
App.vue
<template>
  <!-- default -->
  <router-view></router-view>
  <!-- header -->
  <router-view name="header"></router-view>
  <!-- content -->
  <router-view name="content"></router-view>
</template>
16.8 重定向-别名
const routes = [
  // ...
  {
    path: "/",
    // redirect: "/home",
    // redirect: { path: '/home' },
    redirect: to => {
      return {
        path: '/home',
        query: to.query
      }
    }
  },
];
Home.vue
<script setup>
import { useRoute } from 'vue-router';

const route = useRoute()
</script>
<template>
  Home: {{ route.query.age || '未知' }}
</template>
将 / 设置别名为 /aaa,意味着当用户访问 /aaa 时,URL 仍然会跳转到 /。
const routes = [
  // ...
  {
    path: "/",
    redirect: "/home",
    alias: ["/aaa", "/bbb", "/ccc"],
  },
];
16.9 导航守卫
导航守卫主要用于控制路由跳转的权限、添加加载进度条、设置页面标题等操作,分为 beforeEach(前置守卫)和 afterEach(后置守卫)。
Vue Router 3.x 版本写法
// 白名单:无需登录即可访问的路由
const whiteList = ["/login", "/404"];

// 前置守卫:路由跳转前执行
router.beforeEach(async (to, from, next) => {
  // 启动进度条
  NProgress.start();

  // 已登录(存在token)
  if (store.getters.token) {
    // 若登录状态下跳转到登录页,重定向到首页
    if (to.path === "/login") {
      NProgress.done();
      next("/");
    } else {
      // 未获取用户ID时,处理动态路由(addRoute)
      if (!store.getters.userId) {
        // addRoute 动态路由处理逻辑可补充:
        // const routes = await store.dispatch('getAsyncRoutes')
        // routes.forEach(route => router.addRoute(route))
        // 确保动态路由添加完成后再跳转
        // return next({ ...to, replace: true })
      }
      next();
    }
  } else {
    // 未登录:白名单内路由直接放行,否则重定向到登录页
    if (whiteList.includes(to.path)) {
      next();
    } else {
      NProgress.done();
      next("/login");
    }
  }
});

// 后置守卫:路由跳转完成后执行
router.afterEach((to) => {
  // 设置页面标题
  document.title = to.meta.title;
  // 结束进度条
  NProgress.done();
});
Vue Router 4.x 推荐写法(组合式 API)
const whiteList = ["/login", "/404"];

// 4.x 更推荐通过返回值控制跳转,简化逻辑
router.beforeEach((to) => {
  NProgress.start();
  const userStore = useUserStore();
  // 未登录且不在白名单,直接返回登录页路径
  if (!userStore.user?.token && !whiteList.includes(to.path)) return "/login";
});

router.afterEach((to) => {
  NProgress.done();
  // 自定义页面标题格式
  document.title = `研究院-${to.meta.title}`;
});
补充:
NProgress是路由跳转时的进度条插件,需提前安装(npm i nprogress)并引入样式。
16.10 路由元信息
路由元信息通过 meta 属性为路由附加自定义数据,可用于权限校验、过渡动画、页面标题、缓存配置等场景,可在导航守卫/路由对象中访问。
基本用法
const routes = [
  {
    path: "/home",
    component: () => import("@/views/Home.vue"), // 推荐懒加载写法
    name: "Home",
    meta: {
      title: "首页", // 页面标题
      transition: "animate__fadeIn", // 过渡动画类名
      requiresAuth: true, // 权限校验标识
      keepAlive: true // 缓存标识(配合keep-alive使用)
    },
  },
];
16.11 路由过渡动画
结合 animate.css 实现路由切换的过渡效果,核心是通过 transition 组件包裹 router-view,并利用路由元信息动态绑定动画类。
步骤 1:引入动画样式(index.html)
<link rel="stylesheet" href="https://cdnjs.cloudflare.com/ajax/libs/animate.css/4.1.1/animate.min.css">步骤 2:配置过渡动画(App.vue)
<template>
  <router-link to="/home">首页</router-link>
  <router-link to="/about">关于</router-link>

  <!-- 路由视图 + 过渡动画 -->
  <router-view #default="{ route, Component }">
    <transition
      :enter-active-class="`animate__animated ${route.meta.transition}`"
      mode="out-in" <!-- 先出后进,避免动画重叠 -->
    >
      <component :is="Component" :key="route.path"></component>
    </transition>
  </router-view>
</template>
补充:
key="route.path"确保路由切换时组件重新渲染,mode="out-in"优化动画执行顺序。
17 状态管理(Pinia)
Pinia 是 Vue 官方推荐的状态管理库,替代 Vuex,支持 Vue2/Vue3,更简洁、支持组合式 API。
17.1 快速上手
步骤 1:安装 Pinia
# yarn 安装
yarn add pinia
# npm 安装
npm i pinia
步骤 2:注册 Pinia 插件(main.js)
import { createApp } from "vue";
import { createPinia } from "pinia";
import App from "./App.vue";

// 创建 Pinia 实例
const pinia = createPinia();
const app = createApp(App);

// 注册插件
app.use(pinia);
app.mount("#app");
步骤 3:创建仓库(store/counter.js)
import { defineStore } from "pinia";
import { computed, ref } from "vue";

// 定义仓库:第一个参数是仓库唯一标识,第二个参数是组合式函数
export const useCounterStore = defineStore("counter", () => {
  // 1. state:响应式状态(替代Vuex的state)
  const count = ref(100);

  // 2. getters:计算属性(替代Vuex的getters)
  const doubleCount = computed(() => count.value * 2);

  // 3. actions:方法(替代Vuex的mutations+actions,支持同步/异步)
  const update = () => count.value++;
  const asyncUpdate = () => {
    setTimeout(() => {
      count.value++;
    }, 1000);
  };

  // 暴露状态和方法
  return { count, doubleCount, update, asyncUpdate };
});
步骤 4:使用仓库(App.vue)
<script setup lang="ts">
import { useCounterStore } from "./store/counter";
// 获取仓库实例(全局唯一,多次调用返回同一个实例)
const store = useCounterStore();
</script>

<template>
  <div>
    基础值:{{ store.count }} | 双倍值:{{ store.doubleCount }}
  </div>
  <button @click="store.update()">count++(同步)</button>
  <button @click="store.asyncUpdate()">count++(异步)</button>
</template>
17.2 storeToRefs:保留响应式解构
直接解构 Pinia 仓库的状态会丢失响应式,storeToRefs 可解决此问题(仅用于状态,方法可直接解构)。
<script setup lang="ts">
import { storeToRefs } from "pinia";
import { useCounterStore } from "./store/counter";

const store = useCounterStore();
// 1. 状态:用storeToRefs解构,保留响应式
const { count, doubleCount } = storeToRefs(store);
// 2. 方法:直接解构即可
const { update, asyncUpdate } = store;
</script>

<template>
  <div>{{ count }} {{ doubleCount }}</div>
  <button @click="update()">count++</button>
  <button @click="asyncUpdate()">async update</button>
</template>
17.3 pinia-plugin-persistedstate:持久化存储
Pinia 默认不持久化状态,通过 pinia-plugin-persistedstate 插件可将状态保存到本地存储(localStorage/sessionStorage)。
步骤 1:安装插件
npm i pinia-plugin-persistedstate
# 或
yarn add pinia-plugin-persistedstate
步骤 2:注册插件(main.js)
import { createApp } from "vue";
import { createPinia } from "pinia";
import App from "./App.vue";
// 引入持久化插件
import piniaPluginPersistedstate from "pinia-plugin-persistedstate";

const pinia = createPinia();
// 注册插件
pinia.use(piniaPluginPersistedstate);

const app = createApp(App);
app.use(pinia);
app.mount("#app");
步骤 3:开启仓库持久化(store/counter.js)
import { defineStore } from "pinia";
import { computed, ref } from "vue";

export const useCounterStore = defineStore(
  "counter",
  () => {
    const count = ref(100);
    const doubleCount = computed(() => count.value * 2);
    const update = () => count.value++;
    const asyncUpdate = () => {
      setTimeout(() => {
        count.value++;
      }, 1000);
    };
    return { count, doubleCount, update, asyncUpdate };
  },
  {
    // 开启持久化(默认存储到localStorage)
    persist: true,
    // 自定义配置(可选)
    // persist: {
    //   key: "custom-counter", // 自定义存储key
    //   storage: sessionStorage, // 存储位置(sessionStorage)
    //   paths: ["count"] // 只持久化count,不持久化其他状态
    // }
  }
);
18_Vue3 重要新特性
Vue3 相比 Vue2 带来了许多重大改进和新特性,本章将介绍几个最重要的新特性。
18.1 Composition API(组合式 API)
什么是 Composition API
Composition API 是 Vue3 最重要的新特性之一,它提供了一种更灵活、更可组合的方式来组织组件逻辑。
与 Options API 对比
Options API(Vue2 风格):
<script>
export default {
  data() {
    return {
      count: 0,
      user: { name: '张三' }
    }
  },
  computed: {
    doubleCount() {
      return this.count * 2
    }
  },
  methods: {
    increment() {
      this.count++
    }
  },
  mounted() {
    console.log('组件挂载')
  }
}
</script>
Composition API(Vue3 风格):
<script setup>
import { ref, computed, onMounted } from 'vue'

const count = ref(0)
const user = ref({ name: '张三' })

const doubleCount = computed(() => count.value * 2)

const increment = () => {
  count.value++
}

onMounted(() => {
  console.log('组件挂载')
})
</script>
Composition API 的优势
| 优势 | 说明 |
|---|---|
| 更好的逻辑复用 | 可以将相关逻辑封装成可复用的函数(Composables) |
| 更灵活的代码组织 | 相关的代码可以放在一起,而不是分散在 data、methods、computed 等 |
| 更好的类型推断 | 对 TypeScript 支持更友好 |
| 更小的打包体积 | 未使用的 API 不会被打包 |
自定义 Composable 示例
// composables/useCounter.js
import { ref, computed } from 'vue'

export function useCounter(initialValue = 0) {
  const count = ref(initialValue)
  const doubleCount = computed(() => count.value * 2)

  const increment = () => count.value++
  const decrement = () => count.value--
  const reset = () => count.value = initialValue

  return {
    count,
    doubleCount,
    increment,
    decrement,
    reset
  }
}
<!-- 使用 Composable -->
<script setup>
import { useCounter } from './composables/useCounter'
const { count, doubleCount, increment, decrement } = useCounter(10)
</script>
<template>
<p>Count: {{ count }}</p>
<p>Double: {{ doubleCount }}</p>
<button @click="increment">+1</button>
<button @click="decrement">-1</button>
</template>18.2 响应式系统重构
从 Object.defineProperty 到 Proxy
Vue2 使用 Object.defineProperty 实现响应式,Vue3 改用 Proxy,带来以下优势:
| 特性 | Vue2 (Object.defineProperty) | Vue3 (Proxy) |
|---|---|---|
| 数组监听 | 需要重写数组方法 | 原生支持 |
| 对象新增属性 | 需要 Vue.set() | 自动响应 |
| 删除属性 | 需要 Vue.delete() | 自动响应 |
| Map/Set 支持 | 不支持 | 支持 |
| 性能 | 初始化时递归遍历 | 惰性代理,按需响应 |
Vue2 响应式的限制
// Vue2 中的问题
export default {
  data() {
    return {
      obj: { name: '张三' },
      arr: [1, 2, 3]
    }
  },
  methods: {
    // ❌ 新增属性不是响应式的
    addProperty() {
      this.obj.age = 18 // 不触发更新
    },
    // ✅ 需要使用 Vue.set
    addPropertyCorrect() {
      this.$set(this.obj, 'age', 18)
    },
    // ❌ 通过索引修改数组
    updateArray() {
      this.arr[0] = 100 // 不触发更新
    },
    // ✅ 需要使用 Vue.set 或 splice
    updateArrayCorrect() {
      this.$set(this.arr, 0, 100)
    }
  }
}
Vue3 响应式的改进
<script setup>
import { ref, reactive } from 'vue'

const obj = reactive({ name: '张三' })
const arr = ref([1, 2, 3])

// ✅ 直接新增属性
obj.age = 18 // 自动响应

// ✅ 直接通过索引修改
arr.value[0] = 100 // 自动响应

// ✅ 支持 Map 和 Set
const map = reactive(new Map())
map.set('key', 'value')
</script>
18.3 Fragment(片段)
Vue2 的限制
Vue2 中组件必须有单个根节点:
<!-- Vue2: ❌ 报错 -->
<template>
  <h1>标题</h1>
  <p>内容</p>
</template>

<!-- Vue2: ✅ 需要包裹 -->
<template>
  <div>
    <h1>标题</h1>
    <p>内容</p>
  </div>
</template>
Vue3 的改进
Vue3 支持多根节点组件:
<!-- Vue3: ✅ 直接支持 -->
<template>
  <h1>标题</h1>
  <p>内容</p>
</template>
优势
- 减少不必要的 DOM 嵌套层级
- 更灵活的组件结构
- 更好的语义化 HTML
18.4 Teleport(传送门)
什么是 Teleport
Teleport 是一个内置组件,可以将组件的一部分模板”传送”到该组件的 DOM 结构外层的位置。
使用场景
- 全局弹窗、模态框
- 通知提示
- 下拉菜单(避免被父容器 overflow:hidden 裁剪)
基本用法
<script setup>
import { ref } from 'vue'
const showModal = ref(false)
</script>

<template>
  <div class="container">
    <h2>这是一个深层嵌套的组件</h2>
    <button @click="showModal = true">打开弹窗</button>

    <!-- 将弹窗传送到 body 下 -->
    <Teleport to="body">
      <div v-if="showModal" class="modal">
        <p>这是一个全局弹窗</p>
        <button @click="showModal = false">关闭</button>
      </div>
    </Teleport>
  </div>
</template>

<style scoped>
.modal {
  position: fixed;
  top: 50%;
  left: 50%;
  transform: translate(-50%, -50%);
  padding: 20px;
  background: white;
  border-radius: 8px;
  box-shadow: 0 2px 10px rgba(0, 0, 0, 0.2);
  z-index: 1000;
}
</style>
Teleport 特点
- 组件逻辑保持不变,只是渲染位置改变
- 支持动态目标
:to="targetSelector" - 可以使用
disabled属性禁用传送
<!-- 条件性禁用传送 -->
<Teleport to="body" :disabled="isMobile">
  <div class="modal">...</div>
</Teleport>
18.5 Suspense(悬念)
什么是 Suspense
Suspense 是一个内置组件,用于协调异步依赖的加载状态,在等待异步组件时显示加载中状态。
异步组件
<script setup>
import { defineAsyncComponent } from 'vue'

// 异步加载组件
const AsyncComponent = defineAsyncComponent(() =>
  import('./components/HeavyComponent.vue')
)
</script>

<template>
  <Suspense>
    <!-- 默认插槽:异步组件 -->
    <template #default>
      <AsyncComponent />
    </template>

    <!-- fallback 插槽:加载中状态 -->
    <template #fallback>
      <div class="loading">加载中...</div>
    </template>
  </Suspense>
</template>
配合 async setup
<!-- AsyncData.vue -->
<script setup>
// 组件 setup 可以是 async
const data = await fetch('/api/data').then(r => r.json())
</script>

<template>
  <div>{{ data }}</div>
</template>
<!-- App.vue -->
<template>
<Suspense>
<template #default>
<AsyncData />
</template>
<template #fallback>
<div class="loading">数据加载中...</div>
</template>
</Suspense>
</template>错误处理
<script setup>
import { onErrorCaptured, ref } from 'vue'

const error = ref(null)

onErrorCaptured((e) => {
  error.value = e
  return false // 阻止错误继续传播
})
</script>

<template>
  <div v-if="error">加载失败: {{ error.message }}</div>
  <Suspense v-else>
    <template #default>
      <AsyncComponent />
    </template>
    <template #fallback>
      <div>加载中...</div>
    </template>
  </Suspense>
</template>
18.6 生命周期钩子变化
Vue2 vs Vue3 生命周期对比
| Vue2 | Vue3 Options API | Vue3 Composition API |
|---|---|---|
| beforeCreate | beforeCreate | setup() |
| created | created | setup() |
| beforeMount | beforeMount | onBeforeMount |
| mounted | mounted | onMounted |
| beforeUpdate | beforeUpdate | onBeforeUpdate |
| updated | updated | onUpdated |
| beforeDestroy | beforeUnmount | onBeforeUnmount |
| destroyed | unmounted | onUnmounted |
| - | - | onRenderTracked |
| - | - | onRenderTriggered |
Composition API 中使用生命周期
<script setup>
import {
  onBeforeMount,
  onMounted,
  onBeforeUpdate,
  onUpdated,
  onBeforeUnmount,
  onUnmounted
} from 'vue'

onBeforeMount(() => {
  console.log('组件挂载前')
})

onMounted(() => {
  console.log('组件挂载完成')
  // DOM 操作、事件监听、定时器等
})

onBeforeUpdate(() => {
  console.log('组件更新前')
})

onUpdated(() => {
  console.log('组件更新完成')
})

onBeforeUnmount(() => {
  console.log('组件卸载前')
  // 清理工作:移除事件监听、清除定时器等
})

onUnmounted(() => {
  console.log('组件卸载完成')
})
</script>
18.7 其他重要改进
更好的 TypeScript 支持
Vue3 从底层使用 TypeScript 重写,提供完整的类型定义:
<script setup lang="ts">
import { ref, computed, type PropType } from 'vue'

interface User {
  id: number
  name: string
  email: string
}

// 类型化的 ref
const count = ref<number>(0)
const user = ref<User | null>(null)

// 类型化的 props
const props = defineProps({
  users: {
    type: Array as PropType<User[]>,
    required: true
  }
})

// 类型化的 computed
const userCount = computed<number>(() => props.users.length)
</script>
更小的打包体积
Vue3 支持 Tree-shaking,未使用的 API 不会被打包:
// 只导入需要的 API
import { ref, computed, onMounted } from 'vue'

// 未使用的 API(如 watchEffect)不会被打包
自定义渲染器 API
Vue3 提供了自定义渲染器 API,可以创建自定义渲染器:
import { createRenderer } from '@vue/runtime-core'

const { render, createApp } = createRenderer({
  // 自定义节点操作
  patchProp,
  insert,
  remove,
  createElement,
  // ...
})
新的内置指令
Vue3 新增了一些内置指令:
<!-- v-memo:缓存模板,性能优化 -->
<div v-memo="[value]">
  <!-- 只有 value 变化时才重新渲染 -->
</div>

<!-- v-bind 批量绑定 -->
<script setup>
const attrs = {
  id: 'container',
  class: 'wrapper',
  style: { color: 'red' }
}
</script>
<template>
  <div v-bind="attrs"></div>
</template>
18.8 Vue3 迁移建议
渐进式迁移
- 使用 Vue2.7:Vue2.7 向后移植了部分 Vue3 特性(如 Composition API)
- 混合使用:Vue3 支持 Options API,可以逐步迁移
- 使用迁移构建版本:
@vue/compat提供兼容模式
迁移检查清单
- 检查废弃的 API(如
$on,$off,$once,filters) - 检查 v-model 用法变化
- 检查自定义指令 API 变化
- 检查生命周期钩子名称变化
- 检查路由和状态管理库版本兼容性
推荐学习路径
Vue2 Options API → Vue3 Options API → Vue3 Composition API → TypeScript + Vue3💡 建议:新项目直接使用 Vue3 + Composition API + TypeScript,老项目可以渐进式迁移。
19_Axios 网络请求
什么是 Axios?
Axios 是一个基于 Promise 的 HTTP 客户端,用于浏览器和 Node.js 中发送 HTTP 请求。它是目前最流行的 HTTP 请求库之一。
Axios 的特点
| 特点 | 说明 |
|---|---|
| Promise 支持 | 使用 Promise API,支持 async/await |
| 拦截器 | 请求和响应拦截器,统一处理 |
| 转换数据 | 自动转换 JSON 数据 |
| 取消请求 | 可以取消未完成的请求 |
| 防御 XSRF | 自动防止跨站请求伪造 |
| 浏览器兼容 | 支持所有现代浏览器 |
| Node.js 支持 | 可在服务器端使用 |
基本用法
19.1 安装 Axios
# npm 安装
npm install axios

# yarn 安装
yarn add axios

# pnpm 安装
pnpm add axios
19.2 导入和使用
// ES6 模块导入
import axios from 'axios'

// CommonJS 导入
const axios = require('axios')
19.3 发送请求
GET 请求
// 基础 GET 请求
axios.get('/api/users')
  .then(response => {
    console.log(response.data)
  })
  .catch(error => {
    console.error(error)
  })

// 使用 async/await
async function fetchUsers() {
  try {
    const response = await axios.get('/api/users')
    console.log(response.data)
  } catch (error) {
    console.error(error)
  }
}

// 带参数的 GET 请求
axios.get('/api/users', {
  params: {
    id: 1,
    page: 1
  }
})
POST 请求
// 基础 POST 请求
axios.post('/api/users', {
  name: '张三',
  age: 25
})
  .then(response => {
    console.log(response.data)
  })
  .catch(error => {
    console.error(error)
  })

// 使用 async/await
async function createUser() {
  try {
    const response = await axios.post('/api/users', {
      name: '张三',
      age: 25
    })
    console.log(response.data)
  } catch (error) {
    console.error(error)
  }
}
PUT 请求
axios.put('/api/users/1', {
  name: '李四',
  age: 30
})
DELETE 请求
axios.delete('/api/users/1')19.4 请求配置
axios({
  method: 'get',           // 请求方法:get, post, put, delete 等
  url: '/api/users',     // 请求地址
  baseURL: 'https://api.example.com', // 基础 URL
  headers: {              // 请求头
    'Authorization': 'Bearer token',
    'Content-Type': 'application/json'
  },
  params: {               // URL 参数
    id: 1,
    page: 1
  },
  data: {                 // 请求体(用于 POST、PUT)
    name: '张三',
    age: 25
  },
  timeout: 5000,          // 超时时间(毫秒)
  withCredentials: true    // 跨域请求是否携带凭证
})
19.5 响应结构
axios.get('/api/users').then(response => {
  // response.data: 服务器返回的数据
  console.log(response.data)

  // response.status: HTTP 状态码
  console.log(response.status)

  // response.statusText: HTTP 状态文本
  console.log(response.statusText)

  // response.headers: 响应头
  console.log(response.headers)

  // response.config: 请求配置
  console.log(response.config)
})
19.6 拦截器
请求拦截器
axios.interceptors.request.use(
  // 请求发送前的配置
  config => {
    // 添加 token
    const token = localStorage.getItem('token')
    if (token) {
      config.headers.Authorization = `Bearer ${token}`
    }

    // 转换数据(如使用 qs 库)
    if (config.method === 'post') {
      config.data = qs.stringify(config.data)
    }

    return config
  },
  // 请求错误
  error => {
    return Promise.reject(error)
  }
)
响应拦截器
axios.interceptors.response.use(
  // 响应成功(状态码 2xx)
  response => {
    // 直接返回 data,简化使用
    return response.data
  },
  // 响应错误
  error => {
    if (error.response) {
      // 服务器返回了错误状态码
      const { status, data } = error.response

      switch (status) {
        case 401:
          console.log('未登录')
          // 跳转到登录页
          break
        case 403:
          console.log('无权限')
          break
        case 404:
          console.log('资源不存在')
          break
        case 500:
          console.log('服务器错误')
          break
      }
    } else if (error.request) {
      // 请求已发出,但没有收到响应
      console.log('网络错误')
    } else {
      // 请求配置出错
      console.log('请求配置错误')
    }

    return Promise.reject(error)
  }
)
19.7 创建 Axios 实例
// 创建 axios 实例
const instance = axios.create({
  baseURL: 'https://api.example.com',
  timeout: 5000,
  headers: {
    'Content-Type': 'application/json'
  }
})

// 使用实例发送请求
instance.get('/users')
instance.post('/users', { name: '张三' })
19.8 实际应用示例
完整的 HTTP 封装(项目中的 http.js)
import axios from 'axios'
import qs from 'qs'

// 创建 axios 实例
const instance = axios.create({
  timeout: 5000
})

// 请求拦截器
instance.interceptors.request.use(
  config => {
    // POST 请求使用 qs 转换数据
    if (config.method === 'post') {
      config.data = qs.stringify(config.data)
    }
    return config
  },
  error => {
    return Promise.reject(error)
  }
)

// 响应拦截器
instance.interceptors.response.use(
  response => {
    // 直接返回 data,简化使用
    return response.data
  },
  error => {
    // 错误处理
    if (error.response) {
      errorHandler(error.response.status, error.message)
    } else if (error.request) {
      console.log('请求已发出,但没有收到响应')
    } else {
      console.log('请求配置出错', error.message)
    }
    return Promise.reject(error)
  }
)

// 错误处理函数
const errorHandler = (status, info) => {
  switch (status) {
    case 401:
      console.log('未登录或登录过期')
      break
    case 403:
      console.log('没有权限访问该资源')
      break
    case 404:
      console.log('请求的资源不存在')
      break
    case 500:
      console.log('服务器内部错误')
      break
    default:
      console.log('未知错误', info)
  }
}

export default instance
在 Vue 组件中使用
import http from '../utils/http'

export default {
  data() {
    return {
      users: [],
      loading: false
    }
  },
  methods: {
    async fetchUsers() {
      this.loading = true
      try {
        // 使用封装的 http 实例
        const users = await http.get('/users')
        this.users = users
      } catch (error) {
        console.error('获取用户列表失败', error)
      } finally {
        this.loading = false
      }
    },
    async createUser(user) {
      try {
        const result = await http.post('/users', user)
        console.log('创建成功', result)
      } catch (error) {
        console.error('创建失败', error)
      }
    }
  },
  mounted() {
    this.fetchUsers()
  }
}
19.9 Axios vs 其他 HTTP 库
| 特性 | Axios | Fetch API | jQuery AJAX |
|---|---|---|---|
| 浏览器支持 | IE11+ | 现代浏览器 | 所有浏览器 |
| Promise | ✅ | ✅ | ❌(需要插件) |
| 拦截器 | ✅ | ❌ | ❌ |
| 请求取消 | ✅ | ✅ | ❌ |
| 自动 JSON | ✅ | ❌(需手动) | ✅ |
| 文件大小 | ~14KB | 内置 | ~30KB(jQuery) |
| 学习曲线 | 简单 | 中等 | 简单 |
19.10 常见问题
跨域问题
问题:浏览器阻止跨域请求
解决方案:
- 开发环境:配置代理(如项目中的 vue.config.js)
- 生产环境:服务器设置 CORS 头
// vue.config.js
devServer: {
  proxy: {
    '/api': {
      target: 'https://api.example.com',
      changeOrigin: true,
      pathRewrite: {
        '^/api': ''
      }
    }
  }
}
请求超时
axios.get('/api/users', {
  timeout: 5000  // 5 秒超时
})
取消请求
const CancelToken = axios.CancelToken
const source = CancelToken.source()

axios.get('/api/users', {
  cancelToken: source.token
})

// 取消请求
source.cancel('取消请求')
并发请求
// 同时发送多个请求
axios.all([
  axios.get('/api/users'),
  axios.get('/api/posts')
])
.then(axios.spread((users, posts) => {
  console.log(users, posts)
}))
19.11 总结
Axios 是一个强大、易用的 HTTP 客户端,特别适合 Vue.js 项目。它的主要优势包括:
✅ Promise 支持:可以使用 async/await ✅ 拦截器:统一处理请求和响应 ✅ 自动转换:自动处理 JSON 数据 ✅ 错误处理:完善的错误处理机制 ✅ 浏览器兼容:支持所有现代浏览器
喜欢的话,留下你的评论吧~